


For any who wonder..."How does Jimbo make a hook?" I decided to show you. I'll edit this picture, daily if I can, to show you the hook's progress. Hopefully all will go well and at the end you'll see a finished biggie hook.
The first step of course I didn't show, but that would have been one of me sawing a hunk of bush maple from one of the many bushes we have up on the crick. The selection process is grilling... it involves going to the crick, enjoying the scenery, visiting the chipmunks, listing to the wind singing in the trees above, and wandering around to find a volunteer. Sorry I couldn't show you all that but it woulda taken up too much space.
So you see the next step. Roughing out the blank with my trusty Buck pocket knife, all the while watching for the best grain to show and trying to leave a bit of bark to keep the character of the donor.. bark can be pretty too you know.
But we'll see if it stays. I never know just what the look will be till its all done. Form follows function; so its a bit of a compromise through the course of making the hook to see how much bark can can be left, all the while making a functional hook.
I'll show one more whittling step next before going to sand paper, then to the saw, then whittling again, then sandpaper again, then finishing.
MORE WHITTLING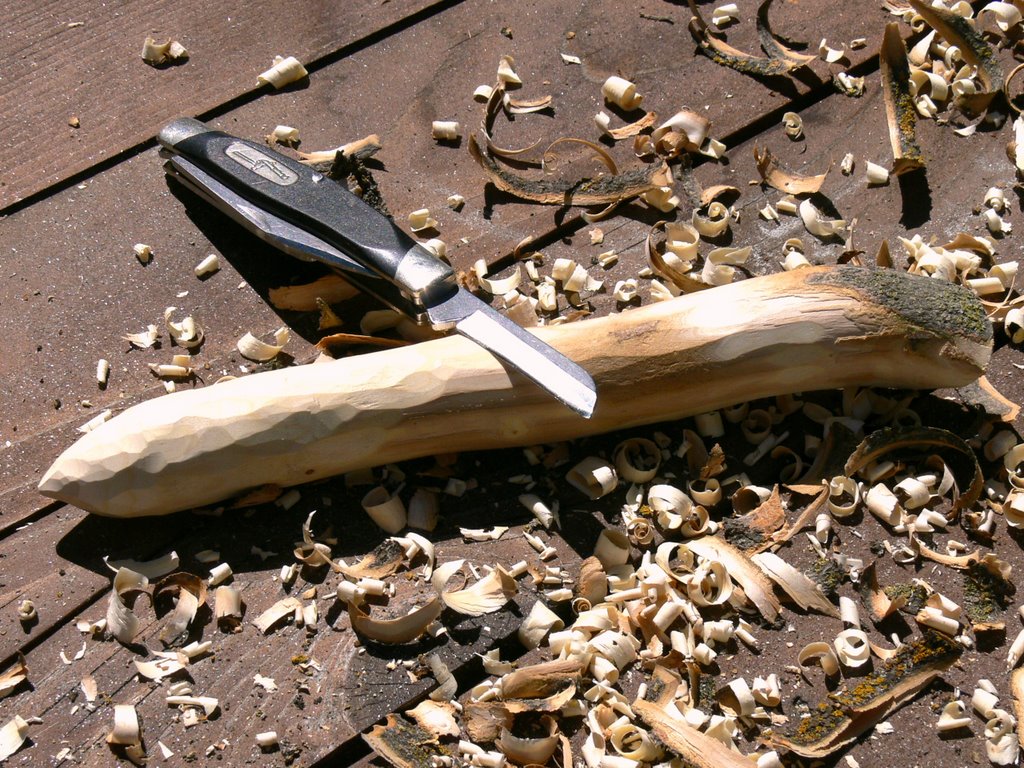
You might have noticed that this hook is really REALLY big. I'm doing that so the steps that I do can be more easily seen. Still, if you're doing a hook for the first time, I think its a good idea not to try for anything under, say, an N. Tiny hooks are a bit more difficult when you're starting and besides if your N doesn't look just right you can always take it down a size or two smaller to remove a little boo-boo. Be careful not to remove too much material.. your hook will look funny if you have to glue shavings back on.
Note to that the first photo shows the tip already shaped. I got a little ahead of myself here. I should have shown a photo of the blank after I whittled the shank to a rough diameter slightly larger than the size desired. You do that first, then shape the tip. That way the tip curvature will be closer to a tangent (remember geometry when the little acorn grew up and noticed "Gee, ah'm a tree"?) Anyways, once a fair length of the shank is shaped to as close to circular as you can get it..you can shape the tip. Take it easy. Hold the stick in one hand by its handle, with the point facing away from you. Now use the thumb of that hand to push against the thumb of the hand holding the knife (the knife holding thumb is placed against the back of the blade). Take a chip off the end, turn the blank, take another chip, turn the blank, take another chip... get the picture? Make the shape akin to what you want the pokey end of your hook to look like. "Pokey" I like that.
Next up.. Sanding... or how to loose 10 lbs while making yourself a crochet hook. Get yourself some sandpaper. I like a progression of paper (Norton is good stuff) starting at about a hunnert grit. Later on you'll going through the grits up to 320.
Oh and the sawing part is coming up too. I'm telling you this in case you need to get a saw. Chainsaws are really cool, but for hooks, I like to use a tiny Gyros back saw that I got at Woodcraft for teeny weenie hooks. I also use a little Japanese "Dozuki" type saw for the larger hook sizes. Both have a reinforcing rib along the back to keep the blade rigid, and both take a very thin "kerf" or cut thickness. Such thin really sharp blades reduce the amount of tear-out (splinters) you'll get at the ends of the cut. Borrow one if you can cause they're expensive. At least $20.
Oh and if you're shopping (or borrowing), consider picking up a small can of polymerized wipe-on oil finish. I use "Minwax Wipe on Poly" and I hear that Woodcraft's General finishes makes an excellent wipe on polymerized oil too. One can ($10-$14)will do a gazillion hooks if you play your cards right. Plus you can use it to re-finish your hook later. Oh, and start looking for some clean white cotton scraps for the finishing steps.
Ok... I gotta go to work. Happy whittlin!
HOW TO LOOSE 10LBS SANDING:
Sorry for the delay. I'm sure you've got your stick picked and the end whittled to a precise shape, and you're wondering where the next instruction is going to be. Well, Blogger was hesitant to let me post the picture. But its here now.
Ok.. so you want to sand off all those purty little knife marks. No better way I know to do it than by hand and sandpaper. I don't like to use really coarse paper so I start with 120 grit, and then move to 220 after I get rid of the whittling evidence. Wisht I could do away with sanding because its tedious and makes me sweat buckets.. but I'm not aware of a better method. I've tried power sanding but you just cant get the smooth curves you need.
Ok so you sand and sand and sand and you end up with what you see above for the first couple inches. I don't bother with the rest of the hook right now cause if I screw up the hook there's no point in having a finished handle, eh?.
You didn't loose 10 lbs? Me either. So I exaggerated.
Next up, the exciting part! Sawing the notch! Stay tuned for this thrilling adventure!
NOTCH SAWING OR OOOPS I NEED ANOTHER STICK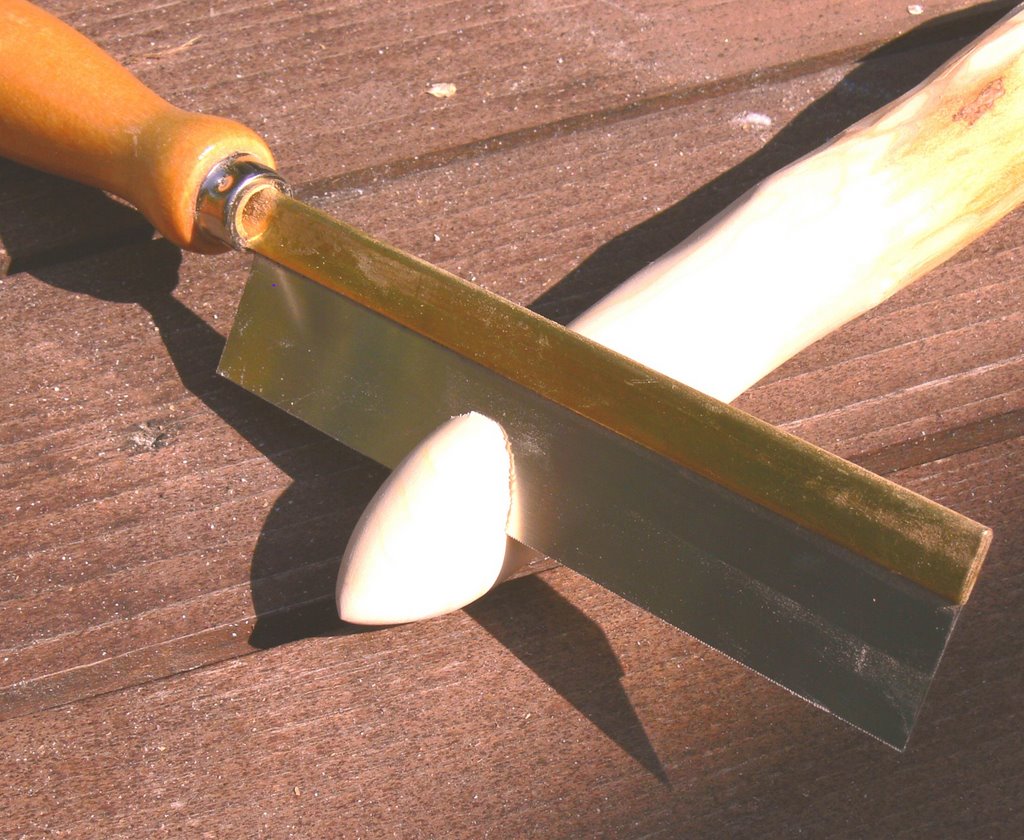 And now we get down to the nittus grittus, the defining moment. If you do this one wrong, you'll be an embarassment to your whole family and they'll be wearing sacks on their heads to hide their shame.
Ok with such a upbeat peptalk... lets cut the notch. Use that brand new saw you just bought... the one with teeeny teeth. Teeneyer the better.
Check the shape of the stick to see where you want the notch in relation to the rest of the handle. Picture where the grip needs to go. Hold the stick as you will when its a hook. Rotate it in your hand till you find where your hand feels the most comfortable, then spot where the notch HAS to be. In sum..its good to use the natural curvature of the stick rather than try to hack out an un-natural shape after you've cut the notch and cast the die.
Cut the notch at an angle that appeals to you. Don't make it too shallow or it might break. Don't make it too steep or it won't hook yarn. Make it just right. Or for those who insist on being anal, use a protractor and make the notch 42.5 degrees +- .00037 minutes up from a horizontal plane.
And the depth of the cut counts too. Too deep and the hook head's in danger of being easily broken off, too shallow and it won't grab yarn. So I suggest going roughly halfway through the thickness of the hook. Once again for you precision freaks.. measure the hook diameter, divide by half, and stick a piece of tape on your saw exactly that distance from the teeth. When you've completed the cut, remove the tape, wash and wax your saw, wrap it in a lightly oiled cloth and put it back in your saw holder and go iron your underwear.
Now for the rest of us, and while those other folks are ironing... Go get another box of Band Aids.... MORE WHITTLING COMING UP
See you later.... Right now I have to go get a new supply of head sacks for the family.
THUMBS UP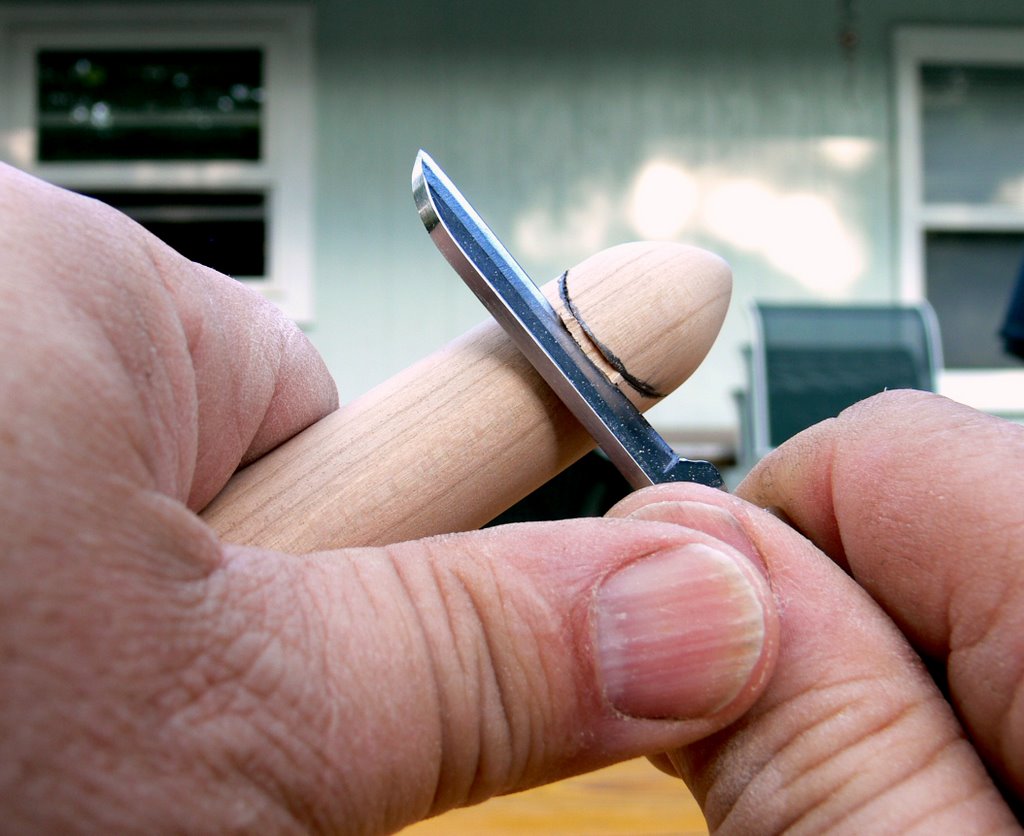
Just to show you I'm all thumbs and that I finally figured out how to use the timer on my camera. Actually i'd have posted this one sooner, but i had to go get my nails done first. (That was one of those burly logger jokes you know...really. Actually I do my own nails..... with a tar-ahrn n 50 grit)
Ok nuff bragging. The steps i'm starting here are best done with your knife gripped as shown and with the thumb of your hook holding hand helping push the knife toward that slit you just cut with your shiny new saw.
Start close to the saw kerf (cut) and whittle a chip. The chip should break off at the kerf and leave you a tiny little ramp. Move the blade back a smidge and take another slice.. you now have a little bigger ramp and the edge of the hook part is now starting to show. You might have to help the chips along a bit by prying a bit. Just don't get carried away and whack the end of the hook off. Thats why i'm showing you this (shhhhhhhhh)totally exclusive ultra seceret Jimbo knife hold. You have MUCH more control of your knife when you use this whittling technique. "What?" you say, "every book on whittling ever written shows that knife hold". "Well just Oh yeah!?" I say back.
Ah but i digress.
Keep shaving and chipping away to enlarge your little angled ramp, making it as smooth as you can, till you finally make the ramp join
with the very bottom of the saw cut. You should now have a V shaped notch made. Don't worry about how it looks... you're about to work magic with........ you guessed it....... MORE Sandpaper!!
Next up... melt off another 10 lbs and exfoliate your fingers at the same time!!
OH ITS STARTING TO LOOK LIKE A CROCHET HOOK!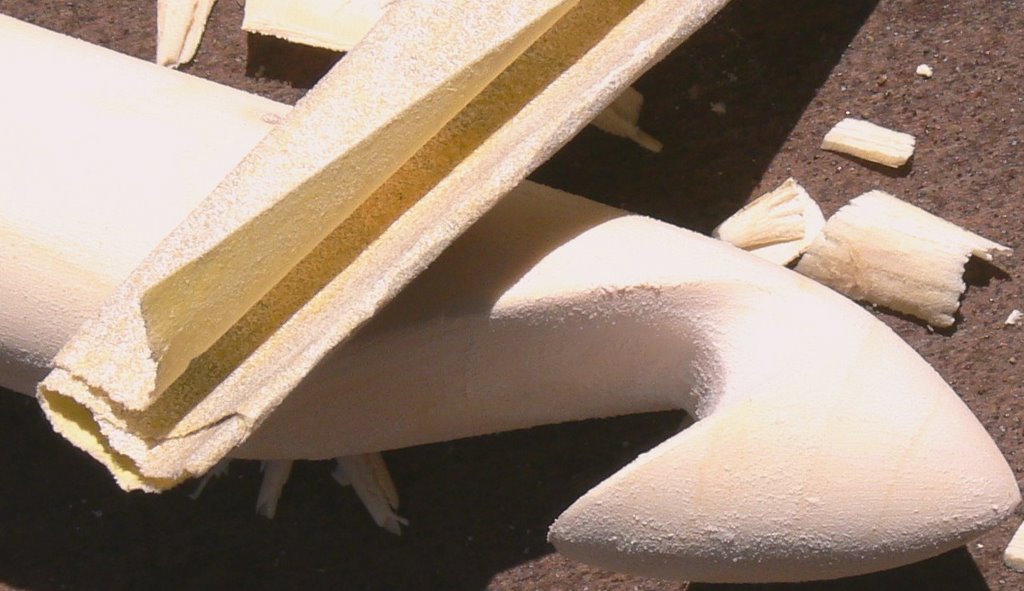
NOW! Here's one of the funnest parts, shaping the gullet (us lumberjack hook whittlers like to call it a gullet cause it looks like the gullet of a saw blade).
Take your sandpaper, oh about 120 - 150 grit and roll it up to the size of the gullet you want and start sanding across the V groove you just made. Now here's a little secret just for you. If your sandpaper wants to crack and balks at being formed into a nice smooth rounded surface, apply a strip of duct tape across the back. The tape will hold the paper against splitting. Nifty eh?
Now as you sand.. check both sides of the hook from time to time to make sure you're sanding both sides of the gullet evenly. Then move the paper to an angle so you form a smooth groove leading into the gullet. As you do this, the paper will also start shaping the hook overhang. Ooooooh aint it purty!
When you get the basic shape you want, switch to finer paper; rolled up the same way and keep sanding till its oh so smooth and the shape is just begging to gather some yarn. Also check the sharp edge of the overhang part and lightly sand it so it isn't too sharp or it'll catch stuff you don't want it to. Make it the shape you want... its YOUR hook you know.
Now look at what you made. Holey cow but its a georgeous thing; a work of art! Isn't it amazing what a smooth and sensual shape you and your little stick just created!?
Congratulate yourself and go have a glass of wine to celebrate, cause the rest is really easy... you're almost done! Heck you could use the hook now if you wanted to.
Next up.... shaping a handle that cuddles with your hand.
SHAPING A CUDDLY GRIP
This will be a quick post without pictures cause I have to go to work this morning and babysit the grandkids after. Sorry. I'll make it up to you later.
Ok, lets do your grip. This can also be a really fun thing, and I imagine a REALLY fun thing since you have your own hand as a model. I have a disadvantage here since my custom hooks are made from photos of the customer's hand holding a hook. You have the real thing!
So what you do is hold the hook as you would while crocheting. Heck, you might as well do a bit of a chain or something just to make sure you're holding the hook as you'd like. But pay close attention first where your thumb and whichever finger you use to grip the hook. It makes a big difference how you make the grip, depending on whether you're a toothbrush gripper or a pencil gripper. Smart folks call these overhand and underhand grips but i've found those terms can be confusing.
Now if you have a helper, you can trace your grip on the handle with a pencil or you can simply eyeball landmarks on the hook where you'd like to make a special shape.
The thumb and finger indentations should go first. And, mind you, you don't have to do both. You can do just the thumb (like the tamarack hook in the post below), or just a finger indent. However you do it, take it easy and start by whittling a small dent in the wood, try the grip, whittle some more, etc. Then sand. Try the grip again and note where the rest of your hand touches the grip. If you've a big hook like the monster i'm using as a model here, you might like a little "dogleg" on the end for you to use in pulling thread or rag for rugs.
Take your time, whittling and sanding till you have shaped a grip to die for. I'll post a picture of the model when i get a chance. Then I'll do another post before we do the finish. OOOOO we'er sooo close to being finished!
What an adventure eh?
FINISHING
Just reviewed this thing and see that i didn't spend much if any time on finishing. So i'll do that now and hope you can forgive me for not finishing up.
Now when I first started making hooks, my thought was to not use any finish whatsoever. That way the hook would develop its own patina by way of the user's hands and the yarn being used. The finish would be a true mark of the owner. I still like the idea. It'd be a great thing to do for your decendents, because they'd be able to pick the hook up and know that your hands and your yarn made this hook the wonder that it is. Plus, since I smoothed the hooks to a velvety smoothness anyway, I figured they'd work just fine. And they did.
But practicality creeeps in. So i started waxing my hooks to protect against moisture and such. Treewax did fine, as did beeswax. Just apply coatings liberally and rub it in, hard. Of the two waxes, I'm finding i prefer the beeswax, just because the stuff i have smells like honey. mmmmmm You can make a hook that'll have you hankering for a little peanutbutter and honey sammich... but i digress. So... wax (paste) can work just fine... just rub it in; let it set a spell, and rub it off. Might as well burn a couple hundred calories while you're at it eh?
And then comes the harder finishes. I use poly-oil type finishes. General Finishes makes a really good one in a can with a paint can style lid so you can dip the hook easily. Others like Minwax make theirs in a can with a screw top that will let you dip too, if the hook's not too big around. Anyways, the idea is to get a good generous amount of finish applied to the hook, either by dipping or applying the oil to a cotton rag (be sure NOT to wad it up and throw it away when you're done... this stuff can start a fire just from spontaneous combustion.... instead leave it open and exposed to air when you're done).
Rub the oil in, hard.... very hard. Make the wood heat up from friction cause you're rubbing so hard. Get ALL the hook including the tip and gullet especially. Rub till the finish is barely tacky, then set it down to dry. It won't take long to dry... maybe oh an hour max. Now pick it up again and rub the beegeebers out of it again this time with a clean rag.. no finish. You can consider the hook done, or if its a softer wood, or if you are one who irons your underwear, you might want to do another two coats just like you did this one.
So you've just made yourself a beauty of a hook that is now an heirloom that will be passed on from generation to generation.... or be eaten by the dog, or whatever. No matter what happens YOU did it and you should be proud. Imagine the wonderous things your very personal hook will make.
Please send me pictures of your hook, and what marvelous things you've made with it.
Thanks for your patience.
Jimbo
Uh, It occurs to me that i'm putting alot of time into this thing and that some unscrupulous copier might take advantage and copy it. So this is a notice to unscrupulous copiers... this stuff is subject to and i am exercising my Copyright to all materials in this blog that are subject to Copyright under any applicable law. Also, if someone would like to publish this... i can be bought.

20 comments:
I'm tuned in for this show. Now if I only had a buck knife....
eh,don' you worry that purty red head.. you don't need a Buck. Just so long as the blade is sharp, sturdy and not too long.
About an and inch and a half is good.
I'm looking forward to following your progress. Great idea!
umm not to jump lessons here but you mentioned saw, what kind of saw?
Just checking cuz you know if we are going to be following at home and I have to opportunity to run to Lowe's and buy more hardware or power tools or whathaveyou I am all over that!
Tools, like yarn and kitchen gadgets are a weakness... I'm shamelss, I know...
I love this Jimbo, now I know what to look for...and the other two hooks are just gorgeous.
Thanks for the comments guys. I'll try to address your questions in the post coming up.
This is great to see the process, it is amazing what you do with a peice of wood Jimbo, simily amazing.
Opps! I meant to say...simply amazing. (My fingers click too quick somtimes!)
Ah shucks, Pam. Simply mighta been a better work. Heck all thats done is a little whack here and a little shaving there and a ton of sanding all over.
Now YOU on the other hand, well lemme say a TV spot for you is a serious understatement in recognition of your art. They should give you your own show!
oops... a frodoean slip. I meant "word" not --work--. Sorry Pam
just amazing! i'm in awe Jimbo
Oh! That was the best post! I want to run out and wittle something right now... but i need to get back to crocheting.
Regina just showed me your gorgeous, immaculate steels that you sent her. I flipped - they are so beautiful and feel so good in your hands. It's unreal...
Please tell me you have time in the next few months for me to commission a couple little hooks from you - pretty please? My email is briana007 at gmail dot com.
Ciao DaVinci!
just mailed you about copyright and creative commons ..
Amazing!
Hey, I received my hooks and I love them! Thank you so much Jimbo!
Now, I want to send you a little something, so send me your address to ladylinoleum at monstercrochet dot com.
just testing to see if comments can still be posted here.
Wow...amazing work Jimbo!
Absolutely lovely crochet hook, but ahh to my dismay mother will not allow me to play with knives. Maybe when I am 10. Thank you for the tutorial, maybe you can convince her of my need to produce quality hand made hooks. Thank you again.
Jimbo, I have made a few hooks before, but you make the process much clearer... thank you!
I actually made a crochet hook of my own, using your tutorial. It's not as fancy as your hooks, but I'm pretty happy with it.
Picture: http://3.bp.blogspot.com/-SNAZ66K2DFw/Vnd2HOZQN1I/AAAAAAAADxM/2gKEt9tHJZs/s1600/finished%2Bhook.jpg
http://amylynn98.blogspot.com/2015/12/i-made-crochet-hook.html
Thank you for sharing your information. :)
Can hardly wait to try this. I need a VERY large hook for making a rug with clothesline & don't want to pay a fortune. I recently made a pair of large, long knitting needles out of dowels with a round wooden drawer handle glued on the not-pointy end. I cheated, tho and clamped my belt sander upside down to my workbench to shape the pointy ends....Then sanded like heck! They're great!
Post a Comment